Hello Mac: What to Do First when You Receive a Used MacBook
This is an addendum to my series on on Getting Rid of My MacBook — essential information that's hard to find!
If you're on the receiving end of a transfer of ownership of a Mac, here's what you should do:
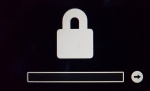 Hold down Cmd-R while turning on the Mac. If you see the lock icon, then stop right here! The prior owner has set a Firmware Password (see Apple's help page). You have three ways to get this fixed:
- ask the prior owner to reset the Firmware Password
- ask the prior owner for the Firmware Password and reset it yourself, or
- go to an Apple store and prove that you are the rightful owner of the Mac.
- You can't know what state your Mac is in — it might contain malware or other junk from the prior owner. In any case, I recommend you start from a clean slate by erasing the built-in boot disk and installing a fresh operating system.
 If your Mac displays the missing operating system icon, then the prior owner has already erased the disk, but I would still do it again myself to ensure that I have the correct disk format.
Also, you did not hold down Cmd-R while starting up. Hold down the on/off button until your Mac turns off and try again.  If your Mac asks for a WiFi network, then the prior owner has already erased the disk, but I would still do it again myself to ensure that I have the correct disk format.
Select a network from the list and enter the associated password.- Either way, you should get here:
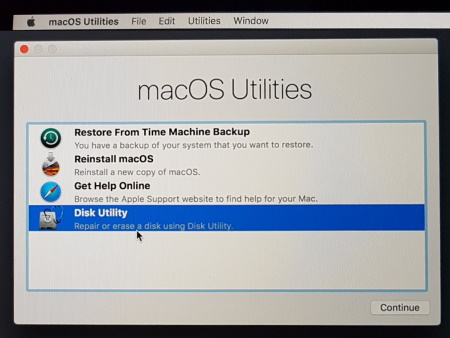
To erase your disk, run Disk Utility.
Select your hard disk on the left and click [Erase].
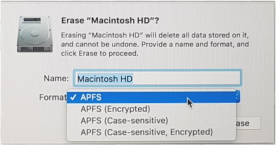 Resist the temptation to select anything but the default format.
If you choose the "Encrypted" version now, you will save time by eliminating step 10 below, but you'll get a useless, ugly-looking "Disk Password" pseudo user login option on your start-up screen (to unlock your disk, but you'll still have to log in, too) — I recommend to activate FileVault in step 10 instead. Alternatively, you can later remove "Disk Password" by following these instructions.
Click [Erase].
After it's done, close the Disk Utility.
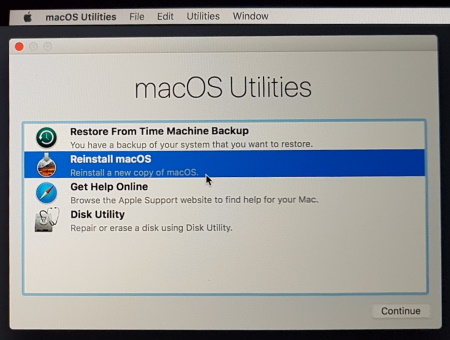
Run Reinstall macOS.
- If you come across the "The recovery server could not be contacted" message...
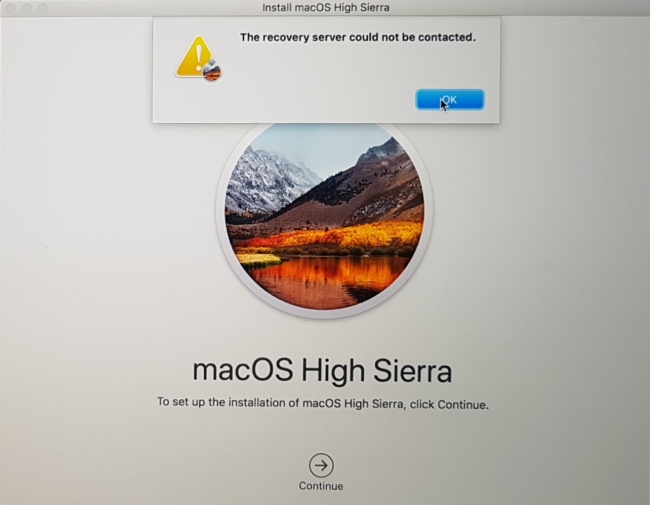
... don't panic! Just hold down the on/off button until the Mac turns off. Then restart while holding down Cmd-R, connect to your WiFi network (step 3), and continue with step 7.
- Follow the prompts.
- When the Mac has started up, if you value security and privacy, and you followed my suggestions to not enable encryption in step 6, open System Preferences from the Apple menu, and type "FileVault" in the Search box. You'll find it in "Security & Privacy". Click the lock icon and turn on FileVault. (This will take a long time, like some hours!)
- Enjoy your new computer!
- Either way, you should get here:
If neither of these work, then you're out of luck, and you'll never be able to reset your Mac to factory settings.
DO NOT continue these instructions and never ever erase your SSD or hard disk, because this would make your Mac permanently unusable!